
3D compositing can be extremely challenging but at the same time, very rewarding. Unfortunely, one of the difficult parts of compositing is to create a format that is usable in a variety of editing environments. Lightwave's alpha channel is an exellent way to do this even if making a "perfect alpha" is quite tricky. The problem with alpha channels is that when an image is rendered using motion blur, DOF or even anti-alias, whatever background information was used during the render, the edges will contain color portions of that because of the way that render passes are mixed together. Another difficulty is casting shadows onto a background image without damaging the background. Here, we will explore the basics of compositing and specifically look at how to create shadows and matte objects that don't interfere with the composited image.
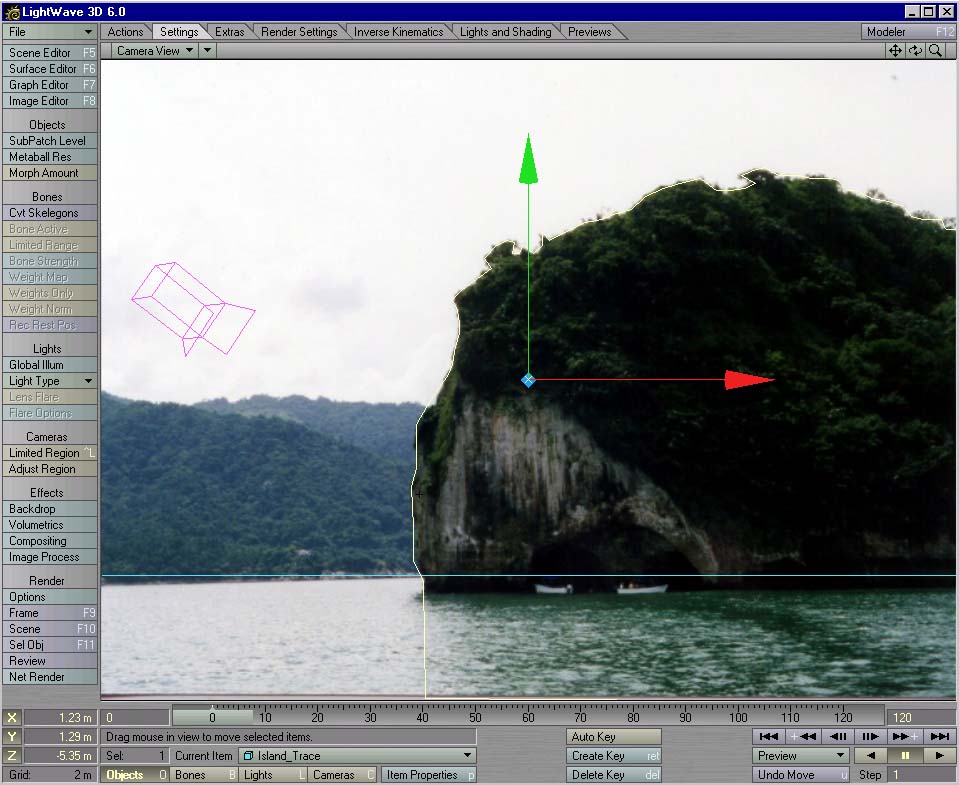
The first thing we need for our 3D composite is a background image. Obviously, you would want video as the background (hopefully the camera was still for ease) but for this tutorial, an image makes things manageable. If you don't have one of your own, download this picture I took of a great snorkelling island at Puerto Vallarta. The first thing we need to do is deside what objects you need to composite from the picture. Here, you need to trace the island so that you can create it as an object and also create a simple plane for the ocean water. Make your plane first and save it. Then there are two ways to create the island, you could trace the island in Modeler from a background image or you could magic wand the sky away in your favorite paint program and then use that new image to clip away another plane in layout.
 |
 |
| Method 1 Trace a Clip map in a paint program using fill and magic wand so that a 2D island can be used in Lightave as an object with very accurate edges. | Method 2 Trace the actual image in Modeler to create an outline of the island as a real object. Use the pen tool to do this. |
 |
OK, are you ready to composite? Load your ocean plane and your island objects into layout. Also load the island image into the background and show it in the camera view. You need to set your ocean plane size large enough so that you can cast shadows onto it and so that it appears in the area of the ocean water from the image.
Its tedious trying to visually line up perspective and positions of these stand-in models but if they are kept simple and you attempt to position them similar with respect to the position of the real camera from the background, you can get it to be quite accurate. Ideally, you would have been on set and recorded all the measurements for positioning your stand-ins later with much better accuracy, but this isn't always possible. |
| Traced Object Using a traced object from modeller is usually easier to line up than the clip map method. You can show the object in wireframe and simply drag it into position and see the edges real time. | However, the clip mapped plane can give a more accurate edge but is difficult to line up without previewing a number of renders to view the clip mapped edge. |
| Next you need your 3D object that you are adding to your scene. If you installed the objects with L[6] then you can load smallplane.lwo from the vehicles directory and fly it into your scene. If you don't have the plane, any flying craft will do.
Note: I thought the UFO object has just simply been done to many times... Anyway, load it in and place it JUST behind your island object in the top view and scale it down if you need to match it to your current scene and grid setting. |  |
 | Notice that your island object can now block the 3D plane in behind the real image. If you don't need to cast shadows onto the island than all you need to do is make it have a front projection image of the background and it will appear the same as the background but the plane can actually fly between them.
However, you need to make sure that the color and intensity is identical on the island object as the backgound image will be. In order to do this you need to set the following surface parameters of the island: COLOR: TEXTURE: Front mapping of the background image. "Pixel Blending" OFF "Texture Antialiasing" OFF LUMINOSITY: 100% DIFFUSE: 0% |
| Now you need to fly the plane from behind the island and have it bank towards the camera and fly overhead much closer. The important part of this composite will be the shadow on the water surface. There are two ways to composite a shadow onto the water.
1. Many people use front projection image mapping to cast a background onto a 3D object so that a shadow can be added to the image. This does in fact work but its major limitation is that the object with the shadow cast onto must be lit to exactly 100% using a mix of luminousity and diffuse. Otherwise it is possible to see a change in intensity at the edges of your object/background transition. Making this lighting and intensity work visually is very difficult to do well, and second, it is very limiting on how you want to light your objects that are added to the scene. Or you can... 2. Use a shadow alpha on the surface to make the surface add only to the alpha information of your image and not the RGB portion. |  |

| 
|
| Ok, to create the images above, make sure that the water surface had shadow alpha enabled as you just did to the surface above. Then, make the object receive shadows but do not cast shadows or self shadow.
Front projection map the background image on the stand-in objects but DO NOT make them 100% luminous. In this case make them 50% luminous and 50% diffuse. That allows the shadow to cause a 50% decrease in alpha intensity for the output. If you use less luminousity, your shadows will be darker and this lets you completely control how you want your shadows to look in the composite. Obviously, you need to match lighting on your objects as well, but a shadow that is too dark or too light will easily be seen. Remember, you want to do such a good job with the composite, that noone will even know it was added and think you just filmed it. (So much for getting much credit...) |

| So once your finished with your surfacing, lighting, motion and shadow intensities, you need to render your scene saving the alpha maps and RGB images. If all your stand-in objects that you don't want to see have shadow alpha enabled in its surface settings, then they will only show through your alpha map if a shadow is cast on it. This makes it easy to now finish the composite in a new scene. Load the same background in as you used before and set it as the backgound image. Then set your just rendered RGB image sequence as the foreground and the just rendered alpha sequence as the foreground alpha. Activate the foreground fader alpha and your finished!
Seamless stand-in objects plus composited objects with their shadows. |

Please check out Ethereal3D.com for more 3D services, animations, objects, and tutorials. |