Yup, I did. Why? My Norco died. I was trying to go up a curb one evening
and noticed that my pedal seemed loose (again). "I welded the cranks
on just last week!" I thought to myself. I got off and inspected
it, everything seemed in good order. I rode a few feet further and
my pedal fell off, unceremoniously dumping me on the ground. The
axle snapped where the cotter pin went through.
Upon dismantling the Norco, it turned out that the frame was cracked
up both sides, right through the bolt-holes where the lollipop bearings
are held in.
"I thought this was a Bedford unicycle review," you say to yourself.
Well, it is. I just have to set up the mood. :)
I told my tale of woe to the wonderful people on rec.sport.unicycling
and they had many helpful suggestions on a new unicycle to buy.
The problem was, I was short of cash. Greenbacks. Moola.
Dinero. You see, here in Canada by the time you end up getting a
unicycle from unicycle.com (great site, keep up the good work guys) it
gets quite expensive. The United is $149usd, which converts to $225cdn,
plus 20% duty to import it plus shipping brings the total to about $300cdn.
However, they only rate the wheel to 160lbs. I weigh 180lbs and have a
propensity for breaking things.
So, one of my friends (Mike King) suggested that I talk to Darren Bedford
about a unicycle. One of the bunch here in Calgary (Brad Davis)
rides an older model Bedford unicycle, so I figured I'd give Darren a
try.
2001 model Bedford
- Square crown frame with endcap style bearing holders, can take up
to a 26" wheel
- 24" wheel with 36 hole hub, Sun 1.25" wide double wall rim and 2.1"
wide smooth whitewall tire
- 5" cranks
- Good quality rubber pedals
- air-adaptable seat
- Good quality quick release
Upgrades/changes from standard model
- Kenda Kollossal 2.6" wide tire
- Downhill tube - IRC 24x2.35-3.00" tube
- 6" cranks
I called him up, and found Darren to be both friendly and helpful.
He was willing to put different parts on the unicycle, so I decided on
a longer seatpost, 6" cranks and a Gazz 2.6" wide tire. Darren had
problems getting the Gazz tires in from Finland so after a few weeks he
suggested that I go with a Kenda 2.6" tire instead. I agreed and
the unicycle arrived on my doorstep a few days later, before I had even
paid for it! Final cost, including shipping, was $325cdn (approx.
$216usd). I believe he gave me a good deal because I waited a few
weeks for the tire issue to be resolved. If you buy something similar,
you might pay a few extra bucks.
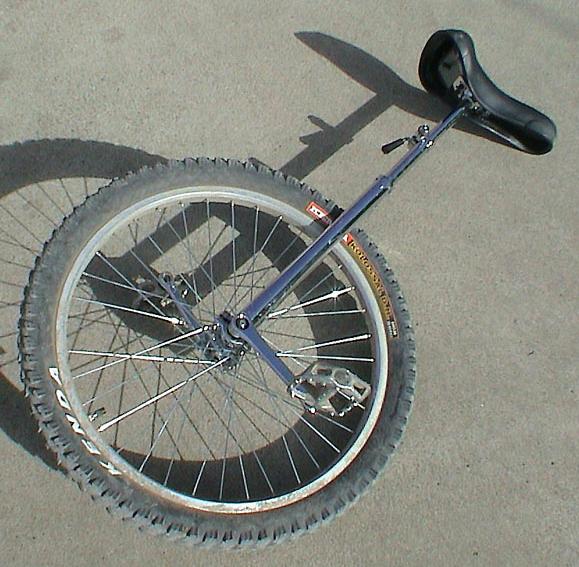
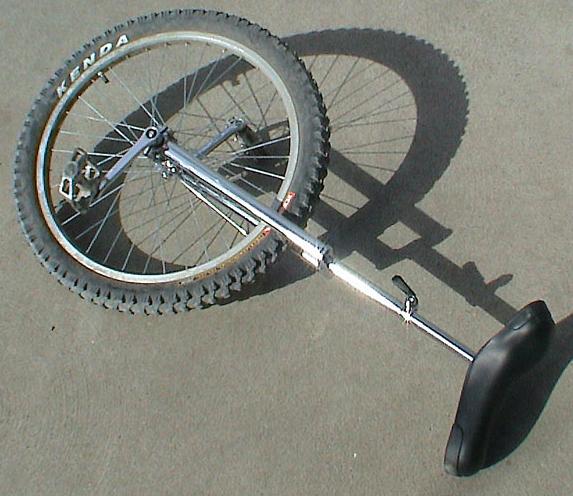
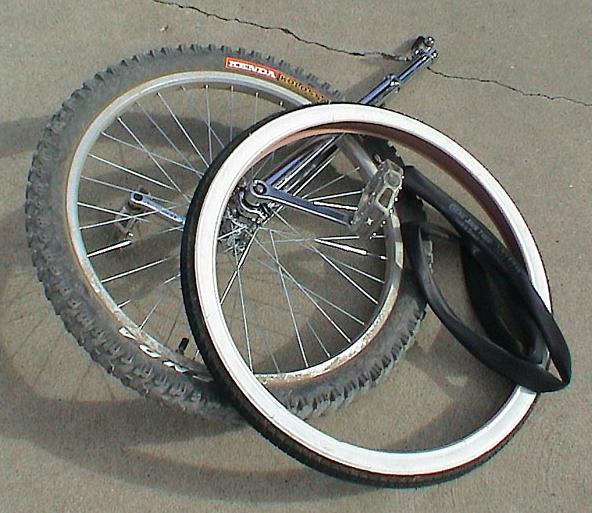
So, here are a couple pictures of the Bedford:

Kenda tire, Sun double wall rim, 6" cranks, quick release and a nice
fat tube... The only parts that didn't come with the unicycle were
the pedals, they're some old GT BearTrap pedals I had on my Norco crapcycle
before it died.
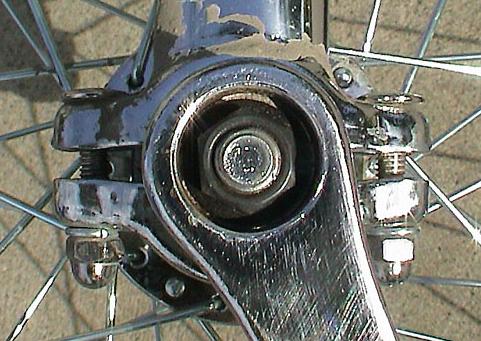
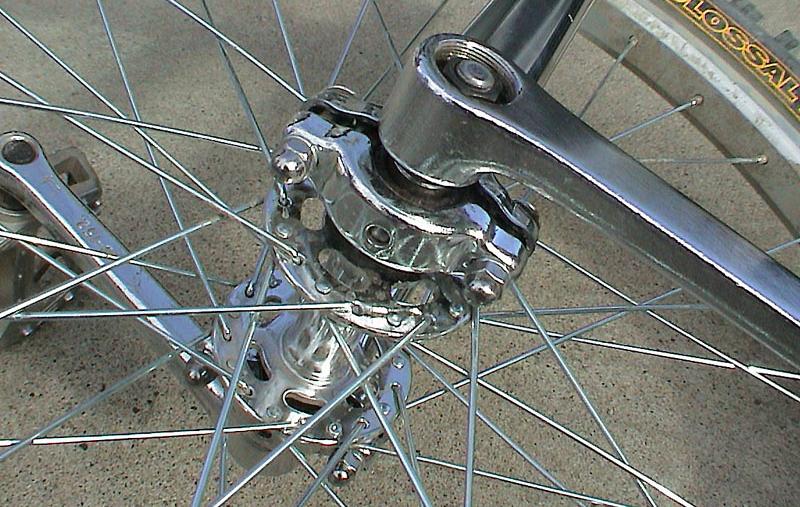
Here are some close-ups of the hub and bearing holder:
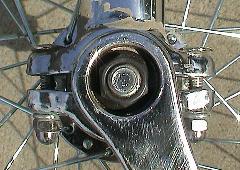

These bearing holders are generally considered to be a good design.
My old Norco used the lollipop style of bearing holders and the frame
was cracked up both sides by the time I junked it. The bearing holders
on the Bedford are a lot less likely to crack the frame, even if the bolts
are tightened too much. You can also see the hub from this angle,
it looks like a hub (wow!).
Astute viewers will notice that the cranks are no longer 180 degrees
opposed to each other (more on this later).

|
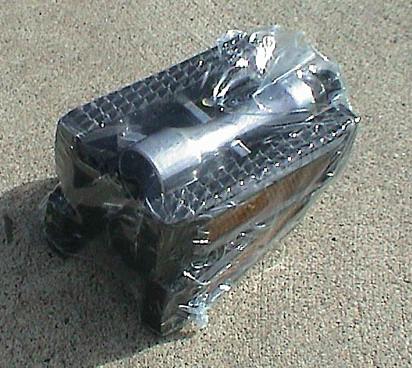
Oooo... Aaaahh... Rubber pedals which came with the Bedford.
Actually they are the heaviest, strongest looking rubber pedals
I have ever seen. They feel like they weigh about twice as
much as my GT pedals, so don't expect them to break any time soon.
The rubber pads extend past the end of the pedal spindle, so these
pedals are ideal for riding indoors. They won't put dents
in the floor, unlike the GT pedals. They also won't eat your
shins like the GT pedals. They also won't grip your shoes
like the GT pedals.
|
|
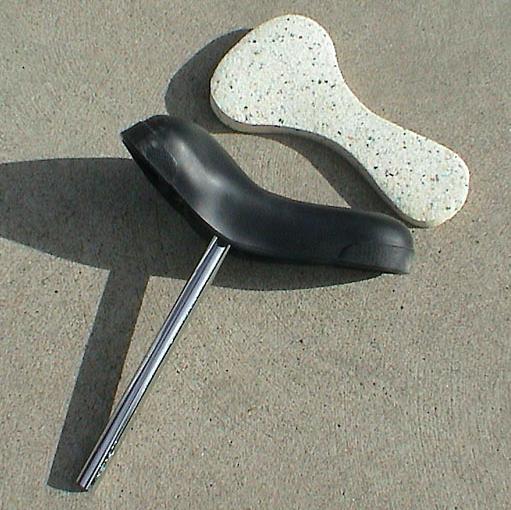
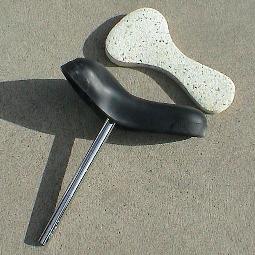
When I talked to Darren on the phone, he said he had found a pretty
comfortable seat that could be converted to an air seat if desired.
When I got it I rode around on it for a few weeks with the seat
foam and found that I could ride it for about an hour before I got
a sore crotch. It was much better than my Norco seat (which
used to draw blood), but still had one painful pressure point right
about mid-crotch. After a while it would feel like you were
sitting directly on the seatpost. I decided to try the air
seat trick everyone else talks about, with good results. Pictured
above is the seat foam and the seat already converted over to an
air seat.
|
|
|
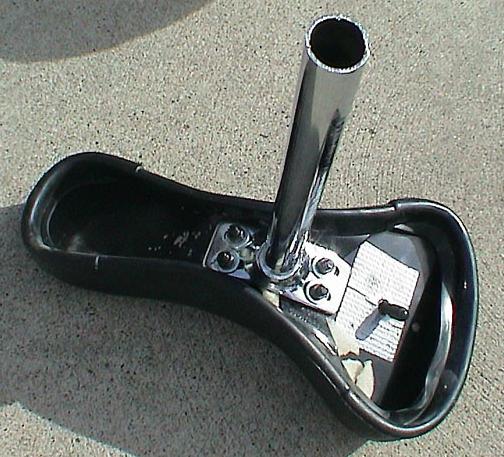
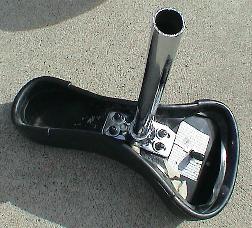
Here's a look at the bottom of the seat. It uses the standard
4-bolt seat mount. The rubber seat cover actually bolts onto
the seat. You can also see where I drilled a hole through
the seat plate for the valve stem to come out through. I didn't
have a file to remove the sharp edges created when I drilled the
hole, so I put duct tape on both sides of the plate to protect the
tube. I also put duct tape over anything that could hurt the
tube inside the seat, including the bolt heads. So far, it
has worked perfectly. The tube was a cheap 12 inch tube destined
for a kids bike. In my opinion this is the cheapest and best
modification you can make to your unicycle if you want to ride for
long periods of time. I have ridden this seat for up to four
hours at a time, with no soreness in my crotch.
As you can see, the seat tube has been hacked off. When Darren
tells you the seatpost will be long enough for you, you might want
to listen (unlike me)!
|
|
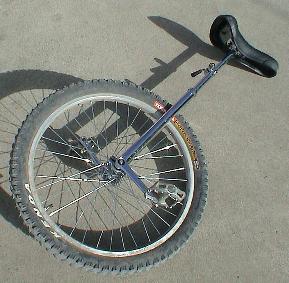
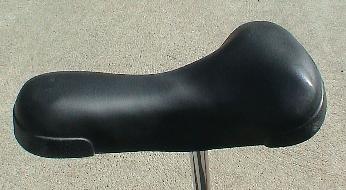
Another shot of the seat where you can see its overall shape.
It's not very well suited to seat out in front riding because the
back is so wide. When I first rode it, it reminded me of one
of those granny bike seats with the springs on them, but now I am
quite happy with it and have decided to ride with a cane. >:P
|
|
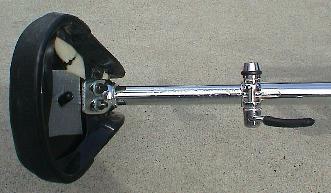
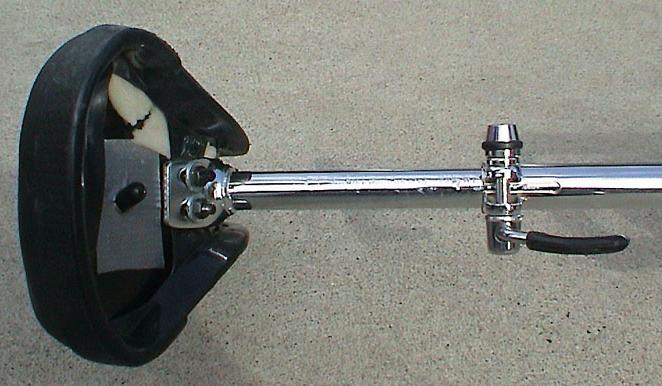
When I talked to Darren on the phone, I told him I didn't want a quick
release on my unicycle. The one I retrofitted on my old Norco kept
bending on me and was absolutely useless. I ended up buying
a meaty bmx seat post clamp with a hex bolt and had awesome results.
Well, Darren convinced me to try the quick release, as you can see.
It definitely is stronger, my old quick release had a 3/16" shaft whereas
this one has a 5/16" shaft. It has worked satisfactorily, to the
point where you can see all those dents in my seat tube caused by overtightening
the clamp to try and keep the seat from twisting (did I mention I'm not
a very good rider? :) ). My only complaint with this setup is that
the seat clamp itself is *welded* to the unicycle. I can't put my
meaty bmx clamp on without first cutting this seat clamp off. The
bmx clamp might not cause the denting like this one because it is solid
aluminum and would distribute the pressure over a larger area on the seatpost.
|
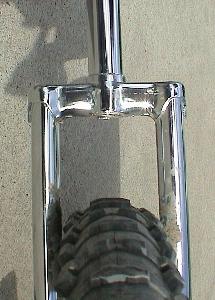
The Bedford comes with a square crown, suitable for foot on frame
riding. You can see the extra height available above the tire,
which Darren added so that people could put in a 26" wheel if they
wanted to. Unfortunately there isn't enough width between
the forks to put a 3" wide tire (Clearance between the forks is
2.75"). In talking with Darren, he said that when he does
his next run of frames next year (2002) he will add the width to
allow for a 3" wide tire.
|
|
All of this brings me to the tire, which is arguably the most important
part of the unicycle since it is *usually* the only point of contact
between you and the environment around you. When I first got
the Bedford in the mail it had this white wall street tire on it.
Good for clowns, not so good for me.
Darren had tucked in the Kenda tire and IRC tube along side the
unicycle for shipping. Due to its size, the Kenda tire had
to be folded in half to fit in the box, kinking the bead on the
tire. It took me a few tries to get that kink out, after one
ride I came back and the tube was sticking out from the tire where
the kink was. Now I have managed to bend it fairly straight
and it hasn't caused me any more problems.
|

|
|
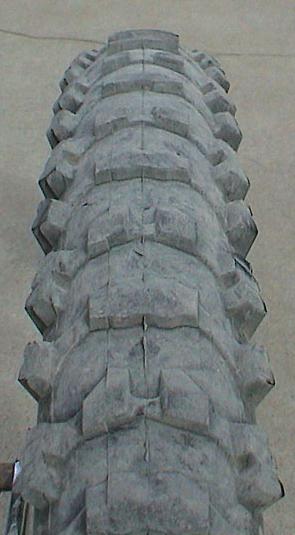
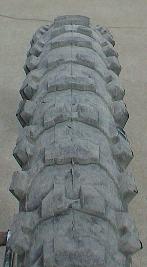
Here is the tread pattern and profile of the Kenda Kollossal 2.6
(2-5/8" measured width). It is fairly round and doesn't want
to "walk" on its own too badly, although it's definitely not as
easy to turn as a street tire. As you can see, the tread is
directional, which is a disadvantage on a unicycle. This is
where a Gazzalodi tire is better because it presents almost identical
traction faces no matter which way it goes. I set the Kenda
tire up to provide better traction going downhill because I hate
wiping out flat on my back, but I am now contemplating turning it
around. Some of the downhill sections in the mountains have
just about ripped my feet off because the tire just *won't* slip,
even when you want it to, not to mention bending the cranks.
The other reason is that now I am getting good enough at climbing
hills that I could use the extra traction for climbing, where slipping
almost always means falling off your unicycle.
|
Assorted and miscellaneous thoughts:
The first few weeks required a lot of attention to the mechanical aspects
of the unicycle. I carried tools with me on every ride, as almost
every connection came loose at one point or another.
- The nuts on the bottom side of the seat work loose if you don't tighten
them up enough (it's hard to tell the right amount of force to use due
to the rubber seat cover being mounted underneath the bolt).
- The pedals came loose when I started to idle, which I retightened
and used blue Loctite on, fixing the problem.
- The crank arms came loose several times as the cranks seated themselves
onto the axle and got used to my weight. The last time I tightened
them was about 3 weeks after I got it, I set one crank arm on a block
of wood with another block of wood sitting on top of the other crank
arm, and hammered the crank arms onto the axle the best I could.
Then I used blue Loctite on the crank arm nuts and tightened them to
about 60 ft/lbs of torque, about as much force as most people use when
putting the lug nuts onto a tire on their car. They haven't come
loose since. If anybody knows the *recommended* torque for
these nuts, please let me know. I don't want to strip the threads
on the axle.
- I have tightened up the spokes several times as they seat themselves
into the rim and start creaking. This Sun rim doesn't have eyelets
around the spoke holes like their DoubleWide rim does, so this is normal
behaviour.
I am hard on this unicycle. I weigh 180lbs and have very strong legs
(I look like a tank when I ride), so I think I have found most of the weak
points in this unicycle:
- The seat post clamp could be better because it dents the seat post.
Simply not welding the clamp onto the unicycle would allow those people
that need it the opportunity to put on a good bmx-style clamp.
- The axle has been twisting since I started hopping with this unicycle,
which explains why the pedals are no longer 180 degrees out from each
other. I have heard that when people are first learning to do hops and
drops they tend to be harder on equipment, so perhaps this is the reason
why. They have been twisting at the 4-sided taper where the pedal goes
on. This is a weakness in the design of these axles, which were made
for bicycles and not for unicycles, although I have heard that the Suzue
brand hub is stronger than this one. Profile has addressed this issue
with a 7/8" axle (instead of a 3/4") and a tapered spline interface
to the crank arm, leaving the end of the axle with a larger cross-sectional
area of material (which in english, means stronger). The price of the
Profile setup shows it as well.
Tire pressure on a Kenda 2.6" tire. The lower the pressure you
can ride with without hitting the rim or folding the sidewall on the tire,
the better. This is also why a wide rim is good, putting more tire
area on the ground and allowing you to run at a lower pressure.
I rode with 18psi and found it was too soft, I was hitting the rim all
the time. I increased it up to 25psi and that worked up until I
got hopping figured out last week and started hitting the rim again.
Yesterday I increased the pressure to 30psi and I don't expect to change
it for quite a while. I have noticeably lost some bounce in the
tire but at the same time know that it will be much more reliable.
Coincidentally, 30psi is also the minimum rated tire pressure printed
on the side of the tire. Maybe those numbers actually mean something.
:) I love the downhill tube because it has been pinched by the tire
hitting the rim numerous times, but is tough enough to survive.
Final thoughts
This is an good unicycle and I love it. From friends who have ridden
it, they say it feels a lot like a Miyata, very stiff and rigid.
It does have some weak points, namely the hub and axle, but you have to
remember that this is a $325cdn unicycle. It is not a Hunter or
Wilder. For anyone looking for a starter unicycle, I would wholeheartedly
recommend it. Spend the extra money and avoid a Norco, you won't
regret it. For anyone without a lot of money looking to replace
their broken Norco, I would also recommend it. It is tougher than
other starter unicycles and starting in 2002 it should be able to take
a 3" wide tire. My rule of thumb is that you would have to spend
about $500cdn to get a unicycle that is significantly better than the
Bedford (Include exchange, shipping and import on a Semcycle XLW or Pashley).
I don't know how big the Canadian unicycle market is, but unicycle.com
would be more attractive if they were able to ship from within Canada
and avoid the stupid Canadian import duties.
I am in the process of getting a Suzue hub for my muni to replace my
existing hub that is bending. Once I get it put in I will see how well
it hops and drops :). Until then, I'm saving up my pennies for next year
when I can buy a Bedford with a 3" wide tire. This unicycle has been the
biggest bang for the buck that I have encountered in quite a while. It
has taken me over obstacles and dumped me onto dirt that I didn't even
know existed. :)
If you are buying a unicycle from Darren, take the time to talk to him
and communicate what your needs are and he will do his best to accomodate
you. He will ship other parts to you if needed. I found him
very helpful in answering my questions about unicycles.
I hope that you found this review helpful. Now for the shameless
plugs: :)
Darren Bedford contact information:
|
bedford_unicycles@yahoo.ca
71 Jasper Ave.
Toronto, Ontario, Canada
M6N 2N2
(416) 767-4742
|
Calgary Mountain Unipsychos
- I hang out with these people and Mike is working on a video where you'll
be able to see Bedfords in action! :)
Unicycle.com - The definitive
source for unicycles. What else is there to say?
Copyright 2001 Jerry Seutter (yello at home dot com) all rights reserved.
Photos taken by Mike King.
|